CloudAtlas
CloudAtlas is a web app built on a machine learning object detection model that I have fine-tuned to help users identify cloud types.
A user uploads a photo (either from their mobile phone camera or from an image stored on their device) and then when they click “submit”, the image is sent to a computer vision model that I have fine-tuned to recognize cloud types. The model takes a few seconds to analyze the image and then returns a percentage that indicates the confidence that the image is of a certain cloud type.
The core of this app is an image classification neural network that I’ve fine tuned to distinguish between ten different cloud types. Fine tuning is a transfer learning technique where the parameters of a pretrained model are updated by additional rounds (epochs) of training on a new set of data for our specific use case. We start with a pre-trained general purpose model that can already recognize basic shapes and objects. Then the model is fine-tuned until it achieves an acceptable ability to identify, in this case, a “cumulonimbus cloud” from an image uploaded by a user.
Steps to Train and Deploy the Model
Training an AI to recognize cloud types involves a process known as supervised learning, where you provide the AI with a labeled dataset of cloud images along with their corresponding cloud types. These are the general steps to train an AI for cloud type recognition:
Data collection: Gather a large dataset of cloud images with accurate labels indicating the corresponding cloud types.
Data preprocessing: Clean and preprocess the dataset by resizing the images to a consistent size, normalizing the pixel values, and splitting the data into training and testing sets. It’s important to have a balanced representation of each cloud type in your dataset to avoid bias during training.
Model selection: Choose an appropriate machine learning model for image recognition tasks. Convolutional Neural Networks (CNNs) are commonly used for image classification tasks due to their ability to learn spatial patterns. In this case, I started with a pre-trained ResNet18 model, which has already been trained on large-scale image datasets and is a fairly quick CNN.
Model training: Train the model using the labeled cloud image dataset. During training, the model learns to extract features from the images and map them to the corresponding cloud types. This process involves feeding the training data through the network, calculating the loss, and updating the model’s parameters through backpropagation and optimization algorithms (e.g., gradient descent).
Model evaluation: Evaluate the trained model using the testing dataset to assess its performance. Metrics such as accuracy, precision, recall, and F1 score can be used to measure the model’s effectiveness in recognizing different cloud types.
Model refinement: If the model’s performance is not satisfactory, you can refine it by adjusting hyperparameters, modifying the network architecture, or increasing the size and diversity of the training dataset. Iterative refinement is often necessary to improve the model’s accuracy.
Deployment and inference: Once you have a trained model with satisfactory performance, you can deploy it to make predictions on new, unseen cloud images. The AI model takes an input image and outputs the predicted cloud type based on its learned knowledge.
Training and Deploying a Model With the fast.ai Library
The fast.ai deep learning library can be used to facilitate this entire training the deployment process. We start by opening up a juptyper notebook and importing the fast.ai library:
pip install -Uqq fastbook
import fastbook
fastbook.setup_book()
from fastbook import *
from fastai.vision.widgets import *
Data Collection: Gather and Label Data
Now we create a list of cloud types we are going to identify. Make a folder for each of these cloud types. Run an image search on Duck Duck Go for 100 each of these cloud types and put the images in their respective folder. Since we are gathering images from an online search, there are likely to be corrupt files. Identify these failed images with verify_images() and then remove these files by running unLink on each of them:
cloud_types = 'cirrus', 'cirrocumulus', 'cirrostratus', 'altocumulus',
'altostratus', 'nimbostratus', 'stratocumulus', 'stratus', 'cumulus',
'cumulonimbus'

path = Path('clouds')

if not path.exists():
    path.mkdir()
    for o in cloud_types:
        dest = (path/o)
        dest.mkdir(exist_ok=True)
        results = search_images_ddg(f'{o} clouds', 100)
        download_images(dest, urls=results)

fns = get_image_files(path)

failed = verify_images(fns)
failed.map(Path.unlink);
Data Preprocessing: Organize Data for Model Training
Now that we have the data downloaded and sorted into folders, we need to organize it in a format suitable for model training. The fast.ai library includes a DataBlock object and dataloaders function that makes this incredibly straightforward:
clouds = DataBlock(
    blocks=(ImageBlock, CategoryBlock),
    get_items=get_image_files,
    splitter=RandomSplitter(valid_pct=0.2, seed=42),
    get_y=parent_label,
    item_tfms=Resize(128))

dls = clouds.dataloaders(path)
In the block argument of the DataBlock object we provide a tuple where we set the cloud images as the independent variable and the cloud type labels as the dependent variable. The RandomSplitter function sets aside twenty percent of the images for a validation set. parent_label is a fastai function that simply returns the name of the folder that a file is in. Since we put each of our cloud images into a folder with the name of the cloud type, this provides the labels for our items. Finally, we apply a transformation on each item with the Resize function so that each of the images are the exact same size.
The DataBlock is like a template for creating a dataloader object. We create a dataloaders object (dls) by then passing the actual path to our data (and labels).
Model Selection and Training
For this project, we are going to use the ResNet18 Convolutional Neural Network. Using the fastai library, we can simply specify resnet18 as as argument on a vision_learner function.
We first create a vision_learner object with the dataloader (dls) and model (resnet18). Then call the fine_tune function on the vision_learner object to specify the number of epochs (training cycles) we want to run on the model. More is not always better. At a certain point, you may run into overfitting your model. In this case, I just ran four epochs:
learn = vision_learner(dls, resnet18, metrics=error_rate)
learn.fine_tune(4)
Model Evaluation and Refinement: Confusion Matrix and ImageClassifierCleaner
The fast.ai library includes a confusion maxtrix module that provides a visual way to evaluate how the model is performing. Simply running these two lines of code pops out a graphic representation of how well the model did with the predictions:
interp = ClassificationInterpretation.from_learner(learn)
interp.plot_confusion_matrix()
After the first time I ran the model, I got this output:
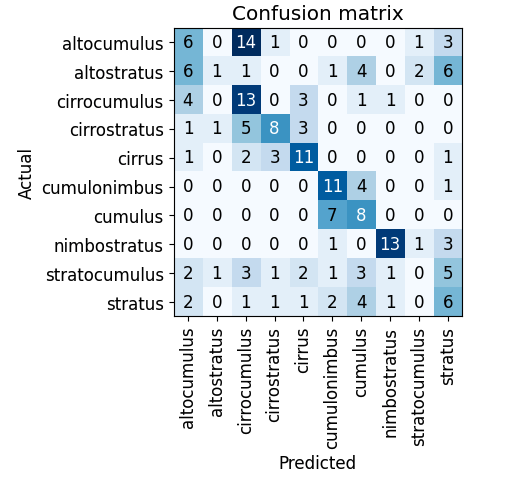
If the model was perfect, we would see a dark blue diagonal line. This model has some room for improvement. We can see that there were 14 times when the model predicted a cirrocumulus cloud when it was actually an altocumulus cloud.
fast.ai includes a handy graphic user interface tool called an ImageClassifierCleaner that allows me to pull out or recategorizee problematic data:
cleaner = ImageClassifierCleaner(learn) cleaner
When I run the ImageClassifierCleaner, it becomes apparent that many of my images are poorly labeled - in both the training and validation sets. In this case, I collected images from a DuckDuckGo image search. These are user-uploaded images that are prone to mislabeling. A more robust strategy would be to collect data from a scientific database such as the World Meteorological Organization International Cloud Atlas.
Running the ImageClassifierCleaner does not fine-tune the model. It simply returns the most inaccurate predictions and allows you to change the labels on images (moves them into a different folder) or remove them entirely. Something counter-intuitive that Jeremy Howard suggests in the fast.ai Practical AI course is to actually fine-tune the model before attempting to sort through all the images and make sure they are correctly labeled. Since the ImageClassifierCleaner returns the most inaccurate predictions first, we can use this process to efficiently extract just the data the is most likely in need of our attention.
Once I am satisfied with the ImageClassifierCleaner process, I can run learn.fine_tune(4) to fine-tune the model again.
This is what my confusion matrix looked like after the second fine-tuning:
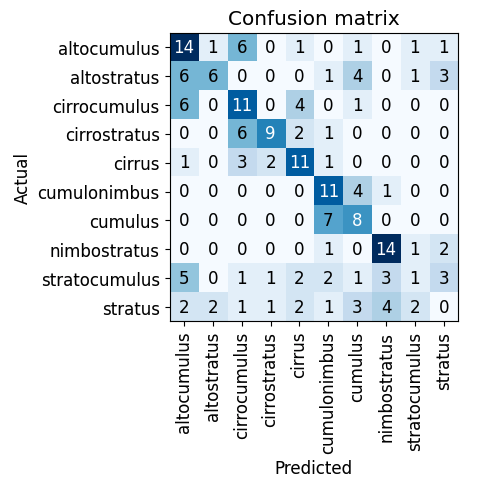
You will notice that some type predictions improved, but some others actually did worse. Now I can focus on those areas and see if there are mistakes I actually introduced during the data cleaning. Fastai makes it very simple to just keep repeating this process until I get to an acceptable result. Since we’re running a cloud detection model and not a cancer detection model, a degree of inaccuracy is acceptable. Additionally, it is likely that some images include multiple types of clouds in the same frame. So in this case it is actually totally fine for the output to be a cloud type prediction that is split between multiple types — there may in fact be multiple types of clouds in the frame!
Deployment and Inference Once I am satisfied with the accuracy of my model, I can export it simply by running:
learn.export()
The output of this whole model fine-tuning process is just a 45mb .pkl file. That’s it.
In order to do the model training / fine-tuning, I used a GPU accessed through Colab. But then to use this model in production, I can simply run it off a consumer grade CPU or upload the model online. HuggingFace is an online community that provides a very simple platform for sharing these models with a straightforward user interface.
I simply create a ‘space’ on HuggingFace and string together a simple app.py script that sets up a Gradio user interface where users can upload images of clouds, connects to the pre-trained Fastai model that classifies the images into one of the predefined cloud categories, and then displays the predicted label onto the interface:
import gradio as gr
from fastai.vision.all import *

learn = load_learner('export.pkl')
categories = ('altocumulus', 'altostratus', 'cirrocumulus', 'cirrostratus',
'cirrus', 'cumulonimbus', 'cumulus', 'nimbostratus', 'stratocumulus', 'stratus')

def classifier(img):
    pred, idx, prob = learn.predict(img)
    return dict(zip(categories, map(float, prob)))

image = gr.inputs.Image(shape = (192, 192))
label = gr.outputs.Label()

iface = gr.Interface(fn=classifier, inputs=image, outputs=label)
iface.launch(inline = False)
This allows me to deploy and share the app on HuggingFace without needing to code up a front-end UI at all. However, the Gradio client on HuggingFace also creates an API so that I can build a UI wrapper around this model. I took that route as well and deployed the CloudAtlas site to Netlify.
Areas for Further Improvement
Going forward, I could fine tune the model further by continuing to run the ImageClassifierCleaner to remove or relabel training and validation data. I could also turn to a more authoratative source to incorporate better quality data.
I could also improve the training by using different model architectures. This model was trained on ResNet-18, but there are numerous other CNN models that I could try. ResNet-18 is just a good starting model because it is quick - it only takes a few minutes to fine-tune. Through the process of fine-tuning the model, I may fine that there are some types of clouds that are difficult to categorize and there are certain models that are better suited to making these distinctions. On the other hand, this is just a cloud recognition app and the level of accuracy achieved with just the ResNet-18 model may be totally sufficient.
The most obvious area for improvement is in error handling. Currently, it does not matter if a user uploads an image that is not of a cloud at all. In fact, if you upload one of those confusion matrix images above, the model will guess that it is a cirrostratus cloud. Given the color pallet, this is not a terrible guess… but still, the model should have some way of running error handling to determine first whether an object is even a cloud at all.
Looking further out, it could be interesting to develop a UI that can be deployed in a spatial computing environment. Instead of using a web interface to upload cloud images, users could access the model API through an augmented reality environment where they would simply look at the cloud and ask for the cloud type.
Takeaways
My experience with this project has given me two valuable insights:
-
Fine-tuning an image classification model doesn’t demand extensive computational resources, time, or massive amounts of data. However, it is crucial to involve someone with domain expertise who can supervise the selection of appropriate labels for the training and validation datasets. Their guidance ensures the model’s accuracy and relevance.
-
The deployment of the model is remarkably straightforward. Once fine-tuned, the model becomes a convenient .pkl file that can be easily deployed using platforms like HuggingFace with a simple Python script. Moreover, accessing the model through an API simplifies the process of developing a user interface (UI) wrapper with additional functionalities and structured output.
The fast.ai library streamlines the fine-tuning and deployment of image classification models and makes it possible to leverage the power of machine learning in a variety of applications with relative ease.